
Vor kurzem wurde map.apps 4.12 veröffentlicht. Dies ist die erste map.apps-Version, die offiziell in TypeScript programmierte Bundles enthält. Da unser Produkt und das Build-System nun eine gute Unterstützung für diese Sprache bieten, möchte ich die Gelegenheit nutzen, um zu zeigen, wie map.apps-Entwickler die Vorteile von TypeScript nutzen können.
Dieser Artikel befasst sich mit den ersten Schritten beim Einstieg in die Bundle-Entwicklung mit TypeScript. Wir beginnen mit einer kurzen Einführung in die Sprache und fahren mit den notwendigen Schritten fort, um TypeScript in mapapps-4-developers-Projekten zum Laufen zu bringen. Schließlich werden wir ein einfaches TypeScript-Bundle entwickeln, das sich in das neue Such-Widget von map.apps einfügt.
Why use TypeScript at all? A quick intro
TypeScript is a language for the web developed by Microsoft. It is a superset of its "base" language JavaScript, adding new syntax to turn it into strongly typed programming language. As a consequence of its well designed type system, TypeScript powers vast improvements with respect to static validation, editor integration and developer tooling in general.
Since its initial release in 2012 it has seen heavy adoption in the web development community and is now considered one of the most loved programming languages.
The benefits of TypeScript include:
- Tight integration into popular IDEs, providing intelligent code completion, semantic analysis (e.g. "Jump to Definition") and refactoring support. This improves developer experience, productivity and reduces the likelihood of bugs.
- Static validation of your code through the advanced type system catches many errors ahead of time that would only manifest at runtime in classic JavaScript code.
- The addition of static types allows development teams to create cleaner abstractions through interfaces and classes. Interfaces can be shared with users, who can then benefit from the improved editor support.
- TypeScript compiles to JavaScript: essentially the type annotations are stripped, resulting in "plain" JavaScript which can then be executed by the browser.
- It also integrates well with existing JavaScript code. This allows teams to gradually transition parts of their software to the new language.
TypeScript in map.apps
At the time of writing, about 11 percent of all map.apps bundle source files are written in TypeScript. This includes new bundles like store-api but also older ones like apprt-binding. In general, new bundles will be written in TypeScript while existing bundles will be migrated step by step.
Note that the transition to TypeScript will not introduce any behavioral changes, because all TypeScript source files will still be compiled to JavaScript. The only observable differences for users of a affected bundle will be improved editor support (through improved type declarations) and improved API documentation generated by TypeDoc.
Getting started
If you're already using mapapps-4-developers, you barely need to do anything. Everything is already set up to get you started right away.
Required Setup
- An IDE with TypeScript support, for example Visual Studio Code or IntellIJ IDEA. I will use VS Code for this article.
- Current mapapps 4 developers and the map.apps 4.12.0 SDK.
Command line examples in this article assume a *NIX operating system. You will need to make the appropriate changes if you're using Windows.
$ git clone https://github.com/conterra/mapapps-4-developers.git
$ cd mapapps-4-developers
# not shown: install map.apps sdk - consult the README.md
$ mvn initialize -P include-mapapps-deps # install all dependencies
$ ./node/npm install -D typescript       # install typescript
$ code .                                 # open in IDE
Benefiting from TypeScript in JavaScript
Using TypeScript in map.apps is entirely optional and plain JavaScript will continue to be supported.
If you followed the setup instructions above, you will already have installed the mapapps type declarations via npm. These d.ts files power TypeScript's compiler and editor support: in this case, they describe the interface of map.apps.
Type declarations for many bundles are still generated from JavaScript code and are therefore not optimal. The best editor support is achieved for bundles that are already written in TypeScript. As map.apps continues to be migrated to TypeScript, editor support will improve as well.
There are a few simple ways to benefit from map.apps' TypeScript support without using TypeScript:
-
Letting the IDE do the work
Editors can provide type information if they detect type declarations for an imported JavaScript or TypeScript module. One way to see this in effect is to head over to
src/main/js/bundles/sample_camera/CameraControlFactory.jsand start typingBinding.which will result in semantic completion suggestions: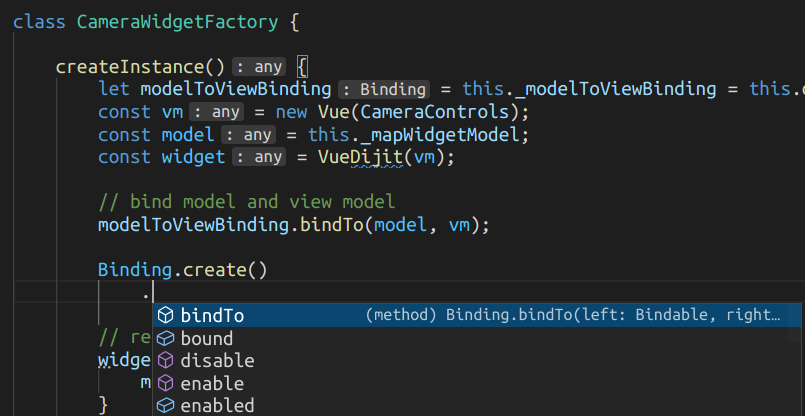
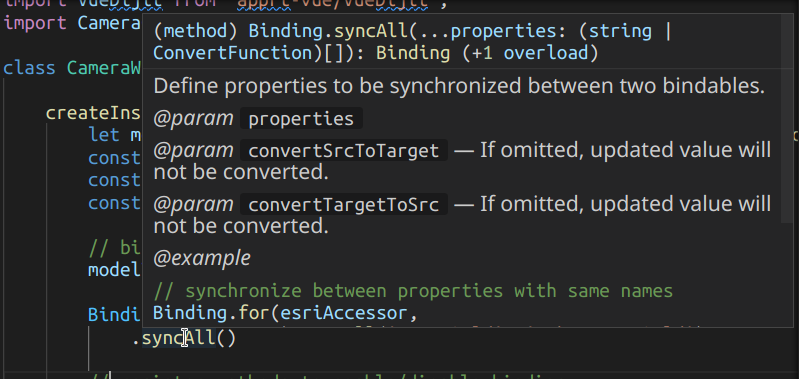
Hovering over of one of Binding's methods will display its documentation in a tooltip, while jumping to its definition (e.g. by CTRL-clicking) will take you to its full signature in the type declaration file:
-
Using JSDoc comments
Since JavaScript lacks type annotations, your IDE will not be able correctly infer types in all situations, for example when multiple functions or files are involved. You can re-add some type information by using JSDoc annotations, which are understood by both the IDE and the TypeScript compiler.
For example, we can decide to inject a reference to the ActionService from the map-actions bundle into the
CameraWidgetFactorycomponent:// manifest.json { "name": "sample_camera", //... "components": [ { "name": "CameraControlFactory", // ... "references": [ // ... { "name": "_actionService", "providing": "map-actions.ActionService" } ] } ] }From then on, the factory can reference
this._actionService, but its type and methods will be unknown to the IDE. We can help the editor by adding a simple annotation to a variable, for example increateInstance():// CameraWidgetFactory.js createInstance() { /** @type {import("map-actions/api").ActionService} */ const service = this._actionService; }Type declarations for services in map.apps bundles live in an
"api"module or directory by convention.VS Code's TypeScript extension can now display the appropriate completions:

The same approach works for parameters, return values and more and can even be used to validate JavaScript code (see TypeScript's Documentation).
Create a simple bundle in TypeScript
In this section, we will create a simple implementation of the Store interface using TypeScript, which we will then configure as a data source for the new search-ui widget. I will assume familiarity with basic TypeScript syntax and semantics; if you have no prior experience, then TypeScript's official intoductions are a good place to start learning. The full source code of this example is available on github.com.
Configure the tsconfig.json file
Authoring a bundle in TypeScript is almost the same as in JavaScript, just with a different file extension (.ts instead of .js). But before we start, we must configure TypeScript's project settings.
The mapapps-4-developers project comes with a simple tsconfig.json file that references the type declarations from map.apps and the ArcGIS API for JavaScript. Other compiler settings must be filled in manually as they depend on your project and your code style. For the following example, we will add these properties:
{
    "compilerOptions": {
        "target": "ES2018",
        "module": "ES2015",
        "moduleResolution": "node",
        "lib": ["ES2018", "DOM"],

        // Optional if you want stronger type checks.
        // Recommended for pure TypeScript bundles.
        "strict": true

        // ...
    }
}
You can now optionally use the TypeScript compiler to diagnose type errors during development (your IDE will also notify you about problems it sees). In your package.json file, add scripts like in the snippet below. They will run the TypeScript compiler in "noEmit" mode, that means doing type checks only:
// package.json
{
    // ...
    "scripts": {
        "check-types": "tsc --noEmit",
        "check-types:watch": "npm run check-types -- -w"
    }
    // ...
}
The simple check-types script checks your code once and then exits. This makes it suitable for things like CI environments or git hooks. check-types:watch continues checking your source files while you edit them. To start type checking from the terminal, run in the project root directory:
$ ./node/npm run check-types:watch
The development server (jetty) will not report type errors on its own. It will even transpile TypeScript files with errors (as if they were valid JavaScript). While this can be convenient during development, it also means that you must run a script like the above to see those errors.
Creating the bundle
We create a new bundle directory in src/main/js/bundles called sample_store. The manifest.json file looks no different than one for a JavaScript bundle. We declare a single Store component with the "useIn": ["search"] property so the search will use it as a data source.
// manifest.json
{
    "name": "sample_store",
    "version": "0.0.1",
    "main": "",
    "i18n": [],
    "dependencies": {
        "apprt-request": "^4.12.0",
        "store-api": "^4.12.0",
        "esri": "^4.20.0"
    },
    "components": [
        {
            "name": "SampleStore",
            "provides": ["ct.api.Store"],
            "propertiesConstructor": true,
            "properties": {
                "id": "sample-store",
                "title": "SampleStore",
                "useIn": ["search"],
                "searchAttribute": "title"
            }
        }
    ]
}
The obligatory module.ts:
// module.ts
import "./SampleStore";
And finally, the skeleton SampleStore.ts module:
// SampleStore.ts
export default class SampleStore {
    constructor(properties: Record<string, any>) {}
    // TODO
}
Implementing the Store interface
The store-api bundle defines the AsyncStore interface which we want to implement right now.
Before we can get started, we must declare the type of our store items:
// SampleStore.ts
import Point from "esri/geometry/Point";

// An interface declares the shape of objects.
interface BusStop {
    id: string; // unique id
    title: string; // display attribute
    geometry: Point; // location
}
Now we can add the implements keyword to our class. Declaring that a class implements an interface, allows the compiler to check whether it is implemented correctly. We pass two type parameters to the store interface: the item type (BusStop) and the id type (string). The compiler will now raise errors because the required methods and attributes are missing:
// SampleStore.ts
import { AsyncStore } from "store-api/api/Store";

export default class SampleStore implements AsyncStore<BusStop, string> {
    constructor(properties: Record<string, any>) {}
    // TODO
}
We can either consult the API documentation or the typings to figure out which methods we have to implement, or we can just use the IDE to generate the attributes and method stubs:
// SampleStore.ts
export default class SampleStore implements AsyncStore<BusStop, string> {
    // (1)
    id: string;
    idProperty: string;

    // (2)
    constructor(properties: Record<string, any>) {
        this.id = properties.id;
        this.idProperty = "id";
    }

    // (3)
    query(query?: ComplexQueryExpression, options?: QueryOptions): AsyncQueryResult<BusStop> {
        throw new Error("Method not implemented.");
    }

    // (4)
    get(id: string, options?: GetOptions): Promise<BusStop | undefined> {
        throw new Error("Method not implemented.");
    }

    getMetadata(): Promise<Metadata> {
        throw new Error("Method not implemented.");
    }
}
There are a few interesting things to note here in comparison to a JavaScript class:
- We declare two string attributes that are used by the AsyncStore interface (the store id and the name of the
idproperty on individual items). They are initialized later from wihin the constructor. It would be an error to assign anything else than astringto these attributes. - The constructor takes a
Record<string, any>as its only parameter. Record is a utility type provided by TypeScript. In this instance we usepropertiesas a mapping from arbitrary strings to values of theanytype. Theanytype can represent any JavaScript value and allows the developer to opt out of type safety when required. Becausepropertiesfor this component are defined either in themanifest.jsonfile or in theapp.jsonfile, usinganyhere feels appropriate. - We take the optional parameters
queryandoptions(they may beundefinedwithin the function) and must return anAsyncQueryResult<BusStop>.AsyncQueryResultsupports many advanced features (such as cancellation or paging); in our case we can simply return an Array of results wrapped in a Promise, i.e.Promise<BusStop[]>. - The
get()method is invoked to load an item by its id. It must return aPromise, but that promise may contain either aBusStop(if found) orundefined(otherwise).
Connecting the data source
The REST API at http://api.busradar.conterra.de/#/default/get_haltestellen will serve as our store's data source. It provides the names and locations (and more) of all bus stops in the city of Münster. As it does not support search, we will simply download all bus stops once (it has only ~1100 entries).
// SampleStore.ts
async function loadBusStops(): Promise<BusStop[]> {
    const data = await request("https://rest.busradar.conterra.de/prod/haltestellen", {
        headers: {
            Accept: "application/json"
        }
    });
    if (data.message) {
        throw new Error(`Failed to load data from REST service: ${data.message}`);
    }

    // Map the untyped features from the json response to instances of BusStop interface.
    const features: any[] = data.features;
    if (!features) {
        throw new Error(`Unexpected response from REST service: 'features' are missing`);
    }
    return features.map((feature) => transformFeature(feature));
}

function transformFeature(feature: any): BusStop {
    const rawGeometry = feature.geometry;
    if (rawGeometry?.type !== "Point") {
        throw new Error(`Unexpected geometry type '${rawGeometry?.type}' in feature, expected 'Point'`);
    }

    return {
        id: feature.properties.nr,
        title: feature.properties.lbez,
        geometry: new Point({
            x: rawGeometry.coordinates[0],
            y: rawGeometry.coordinates[1],
            spatialReference: {
                wkid: 4326
            }
        })
    };
}
We barely do any validation in this example, but we could verify that the properties are actually present (with the expected type) before referencing them. There are also tools to generate TypeScript support code from OpenAPI schema files.
After this legwork is done, finishing the SampleStore class is rather simple:
// SampleStore.ts
export default class SampleStore implements AsyncStore<BusStop, string> {
    id: string;
    idProperty = "id";

    // Promise is not set initially, so we must allow `| undefined`.
    private _busStops: Promise<BusStop[]> | undefined;

    constructor(properties: Record<string, any>) {
        this.id = properties.id;
    }

    async query(query?: ComplexQueryExpression, options?: QueryOptions): Promise<BusStop[]> {
        // the store-api/ComplexQuery helper parses the query for us
        const complexQuery = ComplexQuery.parse(query, options);
        const busStops = await this._getBusStops();
        return busStops.filter((stop) => complexQuery.test(stop));
    }

    async get(id: string): Promise<BusStop | undefined> {
        const busStops = await this._getBusStops();
        return busStops.find((stop) => stop.id === id);
    }

    async getMetadata(): Promise<Metadata> {
        return {
            supportsGeometry: true,
            fields: [
                {
                    name: "id",
                    type: "string",
                    identifier: true
                },
                {
                    name: "title",
                    type: "string",
                    title: "Title"
                }
            ]
        };
    }

    // Only fetch bus stops once, then cache the result.
    private _getBusStops() {
        if (this._busStops) {
            return this._busStops;
        }
        return (this._busStops = loadBusStops());
    }
}
Finally, we configure both the search-ui and our own sample_store bundle in our app.json:
// app.json
{
    "load": {
        "allowedBundles": [
            // ...
            "search-ui",
            "sample_store"
        ]
    }
    // ...
}
The result looks like this:
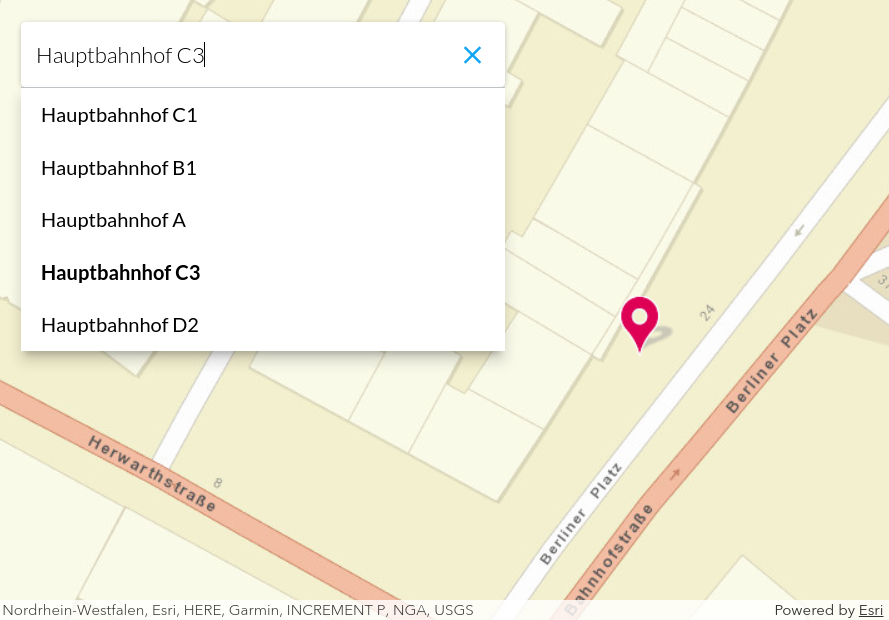
The full source code is available here: Github.